

Max 1700um With Hight Quality and Accuracy Automotive Paint Checking Tools


Related Products
-
 Plating Coating Thickness Measuring ToolNegotiableMOQ: 1 Set
 -
Coating Thickness Gauge Meter Fe/NFe 2 in OneNegotiableMOQ: 1 Set
-
1500 Micron Digital Elcometer Coating Thickness GaugeNegotiableMOQ: 1 Set
-
Good Quality Film Coating Thickness GaugeNegotiableMOQ: 1 Set
-
Smart Mini Digital Car Painting Thickness TesterNegotiableMOQ: 1 Set
The coating thickness measuring instrument uses a dual function measurement method, it can automatically identify magnetic and nonmagnetic substrate, and then use the appropriate test method, it can measure the thickness of the nonmagnetic coating (such as aluminum, copper, enamel, rubber, paint, etc) on magnetic metal substrates (such as steel, iron , alloy and hard magnetic steel).And the nonconductive coating thickness on a non-magnetic metal substrate.
The instrument has advantages of high detection accuracy, reliable and easy to maintain, good stability, simple operation,etc. It can be widely used in manufacturing, metal processing industry, chemical industry, commodity inspection and testing fields.
Technical Specifications
Substrate Fe :steel or iron
Substrate NFe : non-magnetic metals aluminum, copper, brass, zinc,
stainless steel
Measuring Range Fe: 0 - 1700 µm (0 - 67.8 mils)
NFe: 0 - 1700 µm (0 - 67.8 mils)
Resolution :0.1um (0-99um);1um (100-1700um)
Accuracy :±(1.8%um±2um)(0-500um);±(2.2%um±2um) (500-1700um)
Repeatability and Reproducibility study :±1um 0-500um;±2um 500-1700um
Minimum Substrate Thickness Fe: 0.2 mm , NFe 0,05 mm
Minimum Area of Measurement : convexity 5mm concave : 30mm
Operating Temperature :-10 - 60 °C
Use temperature : 0-50°C
Humidity :<80%
Power Supply :2 x AA Batteries
Dimensions :120mmx52mmx25mm
Weight approx. 72 g without battery, with battary of 100g
Features Introduction:
* Automatic identification substrate material and display it on the LCD
* Big screen, and it is visible in the sunlight
*Button is simple, easy to operate ,one-hand operation
* Convenient automatic calibration function
* Automatic correction function to prevent misuse calibration
*Dynamically adapt to environmental features
* V shaped groove suitable for measurements on cylindrical parts
* Special probe structure has better stability
* Beep when measurement or calibration is completed
* 180 display flip
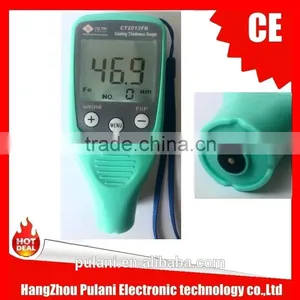
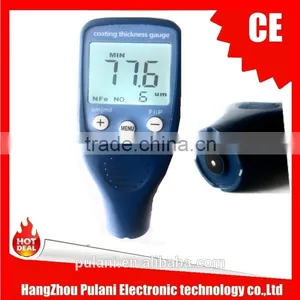
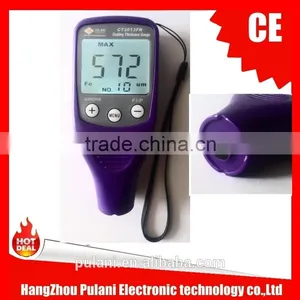
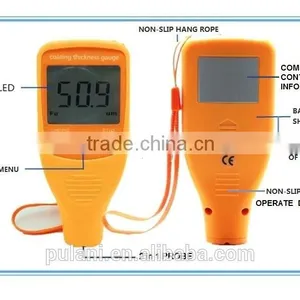
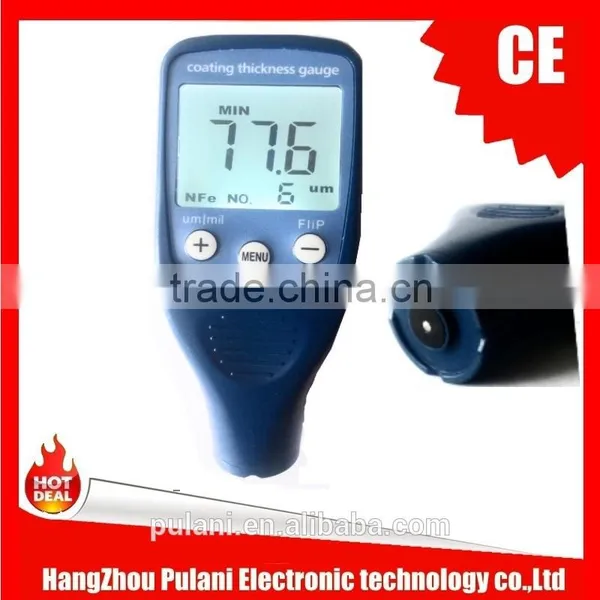
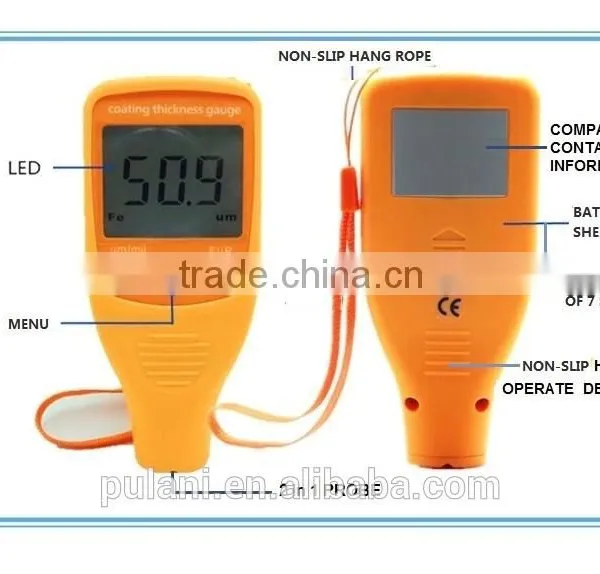
1 Product appearance
The top is the display LCD, the middle are three buttons, "+" "Menu" "-" ,on the bottom is the sensor.
"+" : Data add button / mode selection or switch button
"Menu":Enter and exit the mode of calibration mode, view history data / statistics data
"-" :Data reduced button / mode selection and switch button
2 Switching the instrument ON/OFF
NOTE: The instrument does not have a specific ON/OFF switch. It is the best way to power on the gauge with your hand by a short press , then quickly leave, the device will beeper and show “222” for a second then show with “---” the standby mode, this is the gauge self-testing process.
Please pay more attention that during power on and the self-testing process ,please keep the gauge probe far from with the metal surface .
3 Handling Instruction
When the instrument is switch ON ,it will enter standby mode.
3.1 Switch the display unit
In standby mode, short press "+" key to switch between units of um and mil. After switching units, all of the interface will display in the unit .
3.2 Measurement methods
Place the instrument sensor contacts to the material for tested and pressed, it will automatically turn on, wait 1 to 2 seconds after buzzer short beep sound, the measured data will be displayed on the LCD screen.
When you changed the material substrate to measuring the thickness, please firstly to do the zero calibration to make sure the gauge measuring accuracy based on the right substrate.
3.3 Historical Data
In standby mode Press "MENU" button once, you can enter to view the status of the historical data, instrument store up to 20 groups of historical data.
3.3.1 View historical data
After pressing the MENU screen displays "NO 0.", By a short press "+", "-", you can turn on the next turn data, save up to 20 data. "NO. X" indicates the most recent X time measurement data, the X greater the data more older.
3.3.2 Delete the historical data
Delete current data: In View mode, press "+", "-", select the data you want to delete, long press the "+" button.
Delete all: In View mode, long press the "-" button, can delete all the data. After you remove all 20 sets of historical data show 0.0um.
3.3.3 View statistics
Enter the measuring status, continuous short press "MENU" key, can view the historical data in turn of maximum ,minimum value, average value ,then exit of the statistical value status.If you want to directly measure , only need to put the instruments on the surface which you want to measuring ,it will automatically enter measurement status.
3.4 Switch back-light
In view statistics enter the maximum mode (see 4.2.3) (bottom of the screen display MAX), press "+", you can open / close the back-light. The device will store the back-light setting , so the device will keep the back-light setting of the last setting operate.
3.5 180 Flip the display
When you want to measuring the top surface coating thickness on the top, you could flip the gauge screen , then it is more easy to read the data with gauge.
4 Restore factory setting
In standby mode, continues press "-" key , the instrument will go to restore the factory operation. When the screen shows "000, fe, nfe, cal" and buzzer ,keep press the key of “-”till for a while and all the character has been displayed on the screen, it means that the restore factory settings operate has been finished. At the same time ,the historical data and the calibration value also has been cleared. Please note that in the whole process, we need keep press the key "-" , if you don’t keep press the key of "-" all the time during the whole process , please to redo the whole process. And at the same time, please ensure the instrument probe is not touched with any object (the probe dangling). And this step of the instructions must be in strict carry out, otherwise unknown error maybe occurs.
6 Calibration
Before the measurement, it is better to test the accuracy of the device with the calibration shim. If it is not meet your desire, please calibrate it. The device have 2 kinds of calibration mode, the one is standard calibration, the other one is multi-point calibration, 2 calibration models are very convenient, customers can choose according to their own custom calibration method.
**The standard calibration mode is provided with 0, 50, 100, 250, 500um calibration shim, so as to choose the correct calibration mode and the calibration shim is very important, pay more attention to press the corresponding calibration plate on the shim to complete and convenient.
**The Multi-point calibration which could according to customer different application of spest thickness to do the calibration operate . For example, if you have different thickness standard shims with ours, you could calibration with multi-clibration.
6.1 Standard Calibration
Basic instruction : In the standby mode , long press "MENU" key to enter the film standard calibration status, when the display show "CAL" logo, mean that we have in the film calibration status. The first screen will show of “0.0 cal ” zero film calibration status, there have 5 different calibration status ,press "+" or "-" , the five kinds of film calibration status will be display in turn , detail information as below :
0.0 : zero automatic calibration
50 : 50um film automatic calibration
100: 100 um film automatic calibration
250 : 250um film automatic calibration
500: 500um film automatic calibration
Calibration operate : Firstly ,long press “menu” to enter to the film calibration interface, then select the corresponding calibration mode of 0.0; 50;100;250;500 via short press key“ +”/” -” ,then put the device on the corresponding film, the calibration operate has been finished, this operation can be repeated until you believe it is in the right way. But please pay more attention that measuring the standard film thickness with corresponding film calibration status . [For example, when we switch to 100um film calibration status interface, but we use 50um film to calibration, it will be bring some unknown errors to the device. Although the instrument has a certain ability to automatically identify the wrong operate, but this capacity is limited to give you more information tips .So if when you find that you run this instrument calibration status with a mistake and some unknown errors have been occurs , it is recommended to restore the factory].
**Exit the calibration : when calibration has complete, short press "MENU" to exit the calibration status ,then it will show us the measuring status.
Note:
Zero calibration must be carried out first, and then 50, 100, 250, 500 do calibration.
Such as calibration 50um put the film as 100um, machine display E01, buzzer continuous ring alarm, sensor lift and buzzer to stop ringing.
Standard calibration is also called single point calibration, some versions do not have this feature.
6.2 Multi-point calibration
In the multi - point calibration, we must first do FE and NFE zero - plane calibration according to the method of "standard calibration".
Prepare 4 pieces of plastic shims, and the shims thickness range as : 50±10,100±10,250±15,500±20um.
Then measure a calibration shim on the Fe or NFe substrate, get the measuring value after the instrument to remove the test object, and then long press "+" into the multi-point calibration interface, the screen shows "CAL". At this point, the short press "+" or "-" can adjust the measurement value, and the long press "+" or "-" to speed up the adjustment of 10 times. When adjusted to the standard value of the calibration plate, the calibration is done, and the short press "MENU" key to exit.
6.3 Clear calibration data
First enter the Statistics status and enter to “Min” status (see 4.3.3) , continues press "-" key , the
instrument will go to independent restore the factory operation. When the screen shows "000,fe,nfe,cal" and buzzer ,then keep press the key "-" for a while till all the character displayed on the screen, it means that the restore factory settings operate has been finished..
7 Attention
- 1. Before the measurement, it is better to test the accuracy of the device with the calibration shim. If it is not correct, please caliberate it. Every point of 2-3 times is appropriate.
- 2. If you need more accuracy , the best way to do the calibration every time before measuring , and do 2-3 times press the gauge on the substrate in one calibration operate to get more good data .
- 3. If you calibration with wrong operate , the best way is restore factory with long press”-” .
- 4. When the instrument has more large data deviation ,the best do the 50um calibration firstly, and we suggest that calibration from low data to high data , it can keep the gauge with high accuracy ,such as according to 50um, 100um ,250um, 500um, and so on .
- 5. If you have the zero substrate of your product, the best do the calibration of your own substrate then to measuring the coating thickness on the product
- 6. When the screen appears battery flag alarm, suggest to replace the battery, otherwise the impact of measurement error, if the user no use of the instrument for a long time, it is suggested to remove the battery.
- 7. If the instrument has occured some unusual error, take out the battery, and keep for several minutes, then to restore the gauge, it will be recover.
- 8. If the shim is too thin (less than 0.5mm), too small (less than 25X25mm), not recommended for measurement.
- 9. In the measurement, the probe is kept perpendicular to the measured surface.
- 10. On the edge of the measuring surface or measuring the curvature of the mask, it will affect the accuracy of the measurement.
9 Cue Information
NO |
Symbol |
Meaning |
Operate |
Remarks |
1 |
- - - |
Standby state |
Measurement /view |
|
2 |
FFF |
The measured value is greater than 1700 um or base material is not FE or NFE |
|
|
3 |
AVG |
Mean value |
|
|
4 |
MAX |
Maximum value |
|
|
5 |
MIN |
Minimum value |
|
|
6 |
FE |
Ferrum |
|
|
7 |
NFE |
Not Ferrum |
|
|
8 |
um |
Micron (Metric length unit) |
Short press K1 can switch |
|
9 |
Mil |
Military (British length unit) |
Short press K1 can switch |
|
10 |
CAL |
Calibration state |
Caliberate |
|
11 |
|
Low battery voltage |
Change batery |
|
12 |
E01 |
Misplaced calibration shim |
Play the sult shim |
|
13 |
222 |
On starting |
Get away the probe from meatril object |
|
14 |
NO |
Numero symbol |
Short press the “+”/ “-” |
|
10 Key Description
NO |
Key |
Short press in Key description |
Long press in Key description |
Short press in Calibrate |
Long press in Caliberate |
1 |
+(Left) |
Switch Unit |
multi – point calibration |
Increase(Next) |
Increase(Next) |
2 |
MENU(Midle) |
Check History Record |
standard calibration |
Enter(Exit) |
Exit |
3 |
-(Right) |
Switch Show Direction |
Initialization |
Decrease(Last) |
Decrease(Last) |
Note:The standard calibration is also called single point calibration, some versions do not have this feature.
11 Common Problem
NO |
Problem |
Solution |
1 |
Larger measurement Deviation |
If the deviation caused by the calibration error is large, or abnormal phenomenon shows FFF, please return to the factory after the re calibration |
2 |
Battery alarm |
When the screen appears battery logo alarm, please replace the battery, otherwise affect the measurement accuracy.The user does not need to use the device for a long time, it is recommended to remove the battery. |
3 |
Users have their own base material |
If the user has its own base material, it is recommended to calibrate their own material. |
4 |
Backlight power consumption problem |
Has a relatively power consumption. If you want to save electricity, can turn off the backlight. |
5 |
Boot alarm |
The buzzer conuntinue alarm is due to the probe get away from the material object after start. |
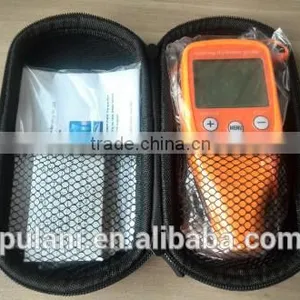
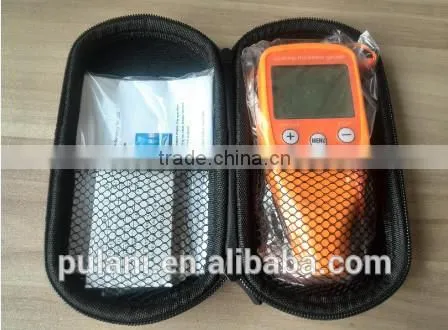
5 pcs gauges you received are with sample package. Now there are 2 types of regular package:
(1) 1 complete set of gauge package: 1 pcs gauge, 1 set calibration, 1 instruction, 1 black glasses box.
(2) 5 complete sets of gauge package: 5 pcs gauge, 5 sets calibration, 5 instructions, 5 black glasses boxes, 1 white carton box whose outside is with the color cover.
Payment
1. We can accept T/T and western union and Money Order,paypal is just for sample fee.The best way is direcet online payment,you can choose yourself.If you want other payment terms please let us know before when you order.
2. Make sure that you have completed all the detailed information like contact person,address,post code and telphone number when filling in your buyer's information.
Shipping
Note:DHL/UPS/Fedex Express usually takes about 3-7 working days to the destination,and it's about 5-8 working days by EMS or TMT(except Russia,which will be delay for 15-30 days).HK Post and CN Post or SG Post takes 7-30 days to ship to worldwide.
1. We will send the goods within 3 business days after the full payment has been confirmed.If the payment is not available,your order will be closed automatically.
2. The buyers are responsible for any insurance,problems and damage which caused by shipping service such accidents,delays or other issues.Besides the buyer should to be responsible for any tax and/or duty charged by their country. (If you want to declare the goods as other item name,or specify an value for custom,please inform us when making the order.we could according to your detail desire for your easy customs clearance and less charge.)
Feedback
1 Buyers early confirmation will be highly appreciated after receiving the items.
2 Since your feedback is very important to our business's development,we sincerely invite you to leave positive feedback for us if you are satisfied with our product and service.It'll just take you 1 minute,but this 1 minute has the extemely vital significance to us.
What we can do
1 All of our products have proceeded again test before shipment and we guarantee to use our products safety.
2 Support imprint your logo on products and let your logo shine anywhere.
3 OEM orders are warmly welcome!
Warranty and Return
1. All products and accessories have been tested by 3 times before ship out. And all products have 1 year warranty. If there is no man-made problem, you can return back the goods for replace a new one , but your side need share the return back delivery cost, and we will share the shipping cost to your side agian .
2. We own the best after-sale service.If any problems happen,our team will do our best to solve for customers.
3. All return items must be in its original conditions,including box and accessories.Men made defects are not guaranteed,such as broken,scratched and so on.
4 For any items,please send by DHL,Fedex or your local express or post when send back .
1) How the coating thickness gauge shut down?
A: Our coating thickness gauge adopt with automatic shutdown, when you stop using it, it will be shutdown automatic after 30 seconds.
2) What angle should be kept with Coating thickness with the analyte ?
A: The probe must be kept perpendicular to the surface with the measured material, otherwise it will lead to considerable error.
3) How to maintain accuracy of measurement when we need repeatedly measurements ?
A: When we need repeatedly measure, the thickness gauge should be keep the distance more than 3cm away from the analyte and at least keep 2 seconds or more interval .(Attention :Do not drag along the surface to the side of the probe to avoid probe magnetization.it will be impact of next measurement result)
4) When should we to calibrate the Coating thickness ?
A: Our thickness gauge has been calibrated , in most time, we just need to check whether the uncoated substrate is normalized to zero .Usually when the measurement accuracy beyond the precision values ,it need to be calibrated (refer to the instructions precision value range) . Calibration method according to operating instructions.
5) When the Coating thickness display with"" ,What does it mean?
A: It indicates that the battery voltage is low, please replace the battery in the automatic shutdown, otherwise it will affect the measurement accuracy.
6) How to choose the zero substrate?
A: The thickness of zero substrate should be used as the test material to avoid the permeability of different materials and measurement errors.
7) How to choose the zero substrate surface?
A: Use the gauge should be in the same part of the material being tested after calibrating to zero, and then measuring the same part. If the measuring pipe, bar and other curve surface materials, but the user indeed calibrating to zero with substrate of flats surface , this will affect the accuracy of the measurement. And choose the calibrating zero surface should be more smooth.
8) Coating thickness gauge has been calibrated, why also the measurement also not accurately?
A: The coating thickness calibration could not choose the substrate random ,firstly calibrating to zero based on the same test material of substrate which without coating , then put the calibration sheet in the top to calibrate, so that could get reliable measurement data. Remember: Be sure to use the same shape, the same material, the same roughness zeroing calibration substrate.
9) Why the different coating thickness measured data is not the same?
A: Due to different coating thickness gauge calibrated with different substrate before use . For consistency, we should make them in the same uncoated substrate to do the zero calibration, and then put the calibration sheet in the top to calibrate, so different coating thickness measurement data will be keep consistent.
10) When should we to replace to Standard film ?
A: The coating thickness calibration depends on the calibration sheet, so it is very important that keep the calibration sheet in good condition. If the calibration sheet has been used for many years and not in a good condition, please replace it . Otherwise, the measurement data will be inaccurate.

Send Inquiry to This Supplier

You May Also Like
-
1000N Digital Push Pull Force Gauge+Digital Force GaugeUS$ 2449.27 - 2799.16MOQ: 1 Set
-
150mm Stainless Steel Pin Contour Gauge Professional Measuring ToolUS$ 1 - 30MOQ: 600 Pieces
-
Precision Measuring Instruments Threaded Plug Gauge ST5/8-11UNCUS$ 1 - 500MOQ: 1 Set
-
7006-29L-4 China Supplier E26 Lamp GaugeNegotiableMOQ: 1 Piece
-
Plug and Socket GaugesUS$ 100 - 600MOQ: 1 Piece
-
Digital Motorcycle Hour Meter Gauge for Gas Engine Racing Dirt ATV Mower Snowmobile MX Motocros 99999Hrs WholesaleUS$ 1 - 10MOQ: 100 Pieces
-
Aluminum Manifold Set With Sight Glass / Manifold Gauge Set for R12, R22 and R502 / Refrigeration Aluminum Manifold GaugeUS$ 0.1 - 0.2MOQ: 1000 Pieces
-
Base 3 Mini 3 Gauge ConsoleNegotiableMOQ: 10 Pieces
-
KNITTING GAUGES WITH GOOD QUALITY AND COMPETITIVE PRICEUS$ 0.1 - 0.3MOQ: 10000 Pieces
-
Digital Thickness GaugeNegotiableMOQ: 10 Pieces


