

DMC WA22 Pneumatic Crimp Tool YJQ-W1Q-BM2 Pneumatic Crimp Tool Unit 20-32AWG Electronic Connectors M22520/2-01

Related Products
-
 DMC WA22 Compatible YJQ-W1Q-BM2 Pneumatic Crimp Tool M22520/2-01 20-32AWG Used in TerminalsNegotiableMOQ: 1 Piece
 -
DMC WA22 Compatible YJQ-W1Q-BM2 Power Connector M22520/2-01 20-32AWG Used in Electronic ConnectorsNegotiableMOQ: 1 Piece
-
DMC WA22 Pneumatic Crimp Tool YJQ-W1Q-BM2 Tool and Hardware M22520/2-01 20-32AWG Used in Electronic ConnectorsNegotiableMOQ: 1 Piece
-
DMC WA22 Compatible YJQ-W1Q-BM2 Tools Pneumatic M22520/2-01 20-32AWG Wire Crimping ToolNegotiableMOQ: 1 Piece
-
DMC WA22 Compatible YJQ-W1Q-BM2 Tool for Car M22520/2-01 20-32AWG Used in Electronic ConnectorsNegotiableMOQ: 1 Piece
GENERAL INFORMATION
1. YJQ-W1Q-BM2 is a pneumatic crimp tool unit (including YJQ-W1Q basic tool, BM2 base plate and pneumatic kit) which is compatible with the M22520/2-01, it is widely used for the crimping of wires and contacts in both military and proprietary programs.
2. Wire crimp range: 20AWG (0.52mm^2) to 32AWG (0.0316mm^2).
WORKING PRINCIPLES
1. Crimping Method
The crimping tool adopts curve propulsion mechanism, its applied force transfers through four curves in the head cavity of the right plier handle to the four indenters. The four intenders do the centripetal linear motion, which makes its front-end teeth crimp the contact to complete the crimping process. The cycle controlled precision ratchet assures the consistency of impression and the crimping quality of wires and contacts.
2. Crimping Range Adjustment
The crimping tool has eight selector numbers; the accurate data are listed as follows:
Selector NO. |
Intender Working Diameter mm/INCH |
|
A GO |
B NO GO |
|
1 |
0.33/0.013 |
0.46/0.018 |
2 |
0.41/0.016 |
0.54/0.021 |
3 |
0.48/0.019 |
0.61/0.024 |
4 |
0.56/0.022 |
0.69/0.027 |
5 |
0.66/0.026 |
0.79/0.031 |
6 |
0.76/0.030 |
0.89/0.035 |
7 |
0.86/0.034 |
0.99/0.039 |
8 |
0.99/0.039 |
1.12/0.044 |
3. Gaging Instructions
“GO” Gaging: keep the tool in fully closed position, insert the green “GO” gage end into the indenter, it should be easy to enter, otherwise, the selector gear is incorrect.
(CAUTION! DO NOT CRIMP GAGE!)
“NO GO” Gaging: keep the tool in fully closed position, insert the red “NO GO” end into the indenter, it can’t pass through completely, otherwise, the selector gear is incorrect.
(CAUTION! DO NOT CRIMP GAGE!)
CRIMPING INSTRUCTIONS
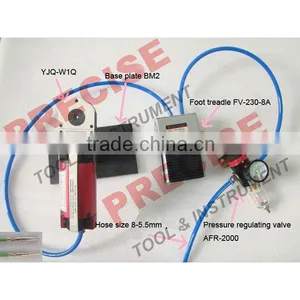
1. Connect the tool frame, base plate, pressure regulating valve and hose as the follow picture.
2. Working air pressure: 80-120 P.S.I.
Maximum pressure: 120 P.S.I.(5.5-8.3BAR)
It is suitable for all positioners which is matched with M22520/2-01 adjustable hand crimp tool. (The positioners should be purchased separately)
3. Insert the contact and prepare the wire through the indenter from the opposite side. Supply air for the tool frame by using foot treadle or hand switch. Loosen it after the crimping operation finished.
4. Remove the finished assembly and insert the next contact to be crimped.
CAUTIONS
1. Keep the crimping tool and other units clean and properly stored when not in use or no operator maintenance.
2. Don’t try to immerse tools in cleaning solution or spray oil into tools to lubricate.
3. If finding anomalies due to the incorrect ways, don’t attempt to disassemble tools or make repairs. Please stop using it and connect us as soon as possible, our company will offer complete refurbishing and recalibration services.

Send Inquiry to This Supplier

You May Also Like
-
Pneumatic WrenchNegotiableMOQ: 2300 Pieces
-
12/19 Needles Air Pneumatic Japan Air ToolsUS$ 35 - 40MOQ: 100 Pieces
-
Air Rivet GunUS$ 15 - 30MOQ: 50 Pieces
-
Simple Type Washing GunNegotiableMOQ: 1000 Pieces
-
Pneumatic PickUS$ 15 - 15MOQ: 10 Sets
-
Air Powered Diamond Chain Saw,Cut off Saw and Breaker HammerNegotiableMOQ: 10 Sets
-
LF-JADG-07 Air Die Grinder (2"SHAFT)US$ 5 - 20MOQ: 500 Pieces
-
Investment Casting Pneumatic Tools Accessories With Stainless Steel and Alloy Steel MaterialsUS$ 0.1 - 5MOQ: 500 Pieces
-
HAND HELD SANDBLASTERNegotiableMOQ: 500 Sets
-
1 Inch Drive Impact WrenchUS$ 0.055 - 0.145MOQ: 500 Sets

