

Made in China of High Performance Eddy Current Conductivity Meter

Related Products
-
 Eddy Current Conductivity Meter Which Have Full Measurment Range Could Testing Pieces Coated With Lacquer for InsulationUS$ 1 - 3,300MOQ: 1 Piece
 -
Most Economic Eddy Current Conductivity Meter Which Have Full Measurment RangeUS$ 1 - 3,300MOQ: 1 Piece
-
For Harsh Environment Low Battery Indicator Ultrasonic Steel Pipe Thickness Measuring Meter InstrumentsUS$ 1 - 500MOQ: 1 Set
-
With 1.0-200mm Measuring Range Handheld Ultrasonic Thickness Tester Meters GaugesUS$ 1 - 300MOQ: 1 Set
-
With 1.0-200mm Measuring Range Digital Ultrasonic Thickness Gauge Tester MetersUS$ 1 - 300MOQ: 1 Set
Specifications
1. large display screen,big front2.excellent design for lift -off compensation and temperature
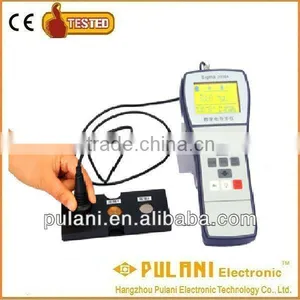
It is the purpose of editing this operation guide to let all our customers master the operation method of PLN-Sigma 2008 easily and quickly. If there is something not clear, please contact our company through hotline of 0086-571-85829611 for technical support.
The following two conditions must be satisfied first, then, you can use this operation guide:
a,At any ambient temperature, set 200C for the compensation temperature of this instrument (without considering the temperature coefficient for the measured sample during measuring).
b,Calibration and measurement should be carried out at the same ambient temperature (to ensure that the calibration block and the measured sample are handled basically at the same ambient temperature)
The basic operation steps for this instrument are as follows:
1,Turn on/Turn off this instrument
At turning off state, press the key for about 2 seconds, this instrument gets into the preheating period for 10 minutes, shown in the following figure. In the preheating period, if you would like to get into the measurement interface directly, you can press the measurement key “MEAS” (normally, we won’t recommend this operation step).
2,Calibration
To ensure accuracy of your measurement, after turning on this instrument, you have to calibrate this instrument first. Besides this, during measuring, if the time-period is more than one hour after last calibration, you have to make another calibration.
Press the calibration key “CAL”, the instrument gets into the calibration interface, shown in the following figure.
2.1 High value calibration
a, Check the digits by the side of “CAL” on the screen. These should be coincident with the high value of the Calibration Block.
b, Put the probe vertically onto the center position of the Calibration Block. After a value appears on the screen, maintain the probe touching the block, press “OK” to confirm the procedure of calibration. After a prompt sound is given, the value that just appeared should be the same as that on the upper part of the screen. Put the probe back to the air and take out the calibration block. The difference between the measured value and the conductivity value of the calibrated block should not be more than 0.3%. Otherwise, you should carry out the calibration procedure according to step b once more, till it meets the requirement. Put the probe back to the air and press key “OK” to confirm that the high value calibration procedure is completed. Then, it is ready for getting into the low value calibration.
2.2 Low value calibration
c,Check the digits by the side of “CAL” on the screen. These should be coincident with the low value of the Calibration Block
d,Put the probe vertically onto the center position of the Calibration Block. After a value appears on the screen, maintain the probe touching the block, press “OK” to confirm the procedure of calibration. After a prompt sound is given, the value that just appeared should be the same as the value on the upper part of the screen (sometimes, due to roundingoff method inside this instrument, if the difference of those two values is about 0.01, that will be regarded as OK ). Put the probe back to the air and take out the calibration block. The difference between the measured value and the conductivity value of the calibrated block should not be more than 0.3%. Otherwise, you should carry out the calibration procedure according to step d once more, till it meets the requirement. Put the probe back to the air and press key “OK” to confirm that the calibration procedure is completed. Then, it is ready for getting into the measurement interface..
3,Measuring
The measuring interface is shown in the following figure.
3.1 When measuring interface, put flatly the probe (in the air >5cm above the tested sample) vertically onto the tested sample surface, for about 2 seconds. The instrument gives out a prompt sound indicating that the measurement is completed. The measured data is held automatically till the next measuring procedure begins.
3.2 When measuring interface, if you want to know the measured value in other measurement unit quickly, you may press key “”. After each key-pressing, it switches to another measurement unit automatically (measurement units: MS/m, %IACS, μΩ·cm). Turning on after off condition, or returning to the measurement interface from other interface, the measurement unit returns to its original unit set.
3.3 When measuring interface, if you want to store the measured data, you may press the data storage key “STORE” during the probe maintaining touching the tested sample after the conductivity value appeared. After that, the digital value N=XXX flashes quickly at the middle row of the screen. This indicates that the measured data has been stored. Or, you can set the data storage mode to automatic one in setting procedure “SET”. Then, every time the instrument gets its measured data, this data is stored automatically (Each time, this instrument is turned on, this instrument tacitly approves the manual storage mode automatically).

Send Inquiry to This Supplier

You May Also Like
-
Honeywell Multi RAE Lite PGM6208 HCHO Portable Pumped Gas Detector Hcho Gas Analyzer Hcho Single Gas Leak DetectorNegotiableMOQ: 1 Piece
-
Portable Digital Plastic Ultrasonic Flaw Detector With Li-battery IP55 LED DisplayUS$ 199 - 2999MOQ: 1 Set
-
Airport Usage X Ray Baggage Scanner for Security CheckingUS$ 11,300 - 12,800MOQ: 1 Set
-
New Waterproof Metal Detector Deep Sensitive Search Gold Digger Hunter 350907US$ 58.42 - 87.63MOQ: 200 Sets
-
Wired Gas Leakage Detector Industrial Lpg Gas Detector GL-02US$ 1 - 50MOQ: 5 Pieces
-
Commercial Needle Metal DetectorUS$ 1,336 - 4,566MOQ: 1 Set
-
Industrial Stainless Steel Chemicals Metal DetectorUS$ 3,000 - 10,000MOQ: 1 Set
-
Food Sanitation Tool - Temperature Indicator Label for Retort SterilizationUS$ 6 - 12MOQ: 10 Pieces
-
Most Accuracy Water Detector ADMT-2SUS$ 1,984 - 2,083MOQ: 1 Set
-
Food Vegetable Metal Detector Inspection MachineUS$ 1 - 9MOQ: 1 Unit
