
Regardless of whether you’ve been doing DIY projects for a long time or just starting, the right adhesive glue for your project can make the entire undertaking much more straightforward and increase its success. Be it repairing valued household belongings or building stunning, creative masterpieces, a glue’s bond affects a project’s outcome. “With so many to choose from, it can become a real headache trying to figure out which one will suit your needs,” explained Dr. Smith. This is the best pair of glue for your work—reliability, versatility, and ease of use are reason enough to continue with this guide. Keep reading to understand how effective a glue can work in seamlessly accomplishing your handy tasks.
What are the best types of adhesive for DIY projects?
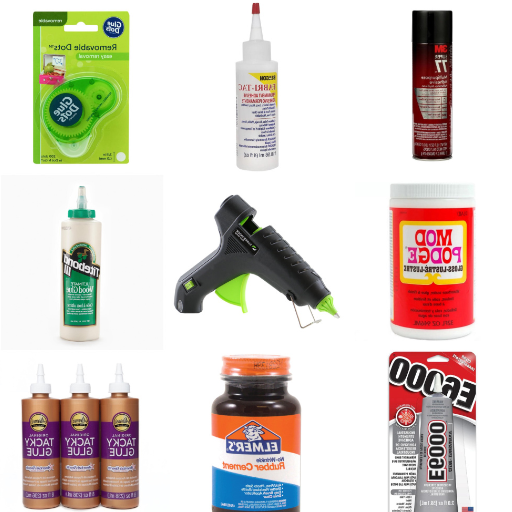
Learning about the various kinds of glue
PVA Glue (Polyvinyl Acetate): PVA glue is one of the most flexible and widely utilized adhesives for Artisan works. It bonds porous materials, such as paper, wood, and fabric. Hence, it is excellent for school projects, woodworking, and crafting. Since PVA glue dries clear and is nontoxic, it is safe to use for both professionals and beginners. PVA glue offers strong bonding strength, but it is not waterproof unless specially formulated as such.
Epoxy Adhesive: Epoxy adhesives consist of two parts — resin and hardener — which, when mixed, create a bond that is both highly durable and resistant to chemicals. Epoxy adhesives are ideal for challenging projects that require working on ceramics, metals, or even plastics. This type of glue is famous for its superior strength and ability to fill gaps, making it perfect for both heavy-duty applications and repairs. Formulations may differ, and as such, curing times may vary from minutes to hours.
Super Glue (Cyanoacrylate): As the name suggests, super glue is ideal for urgent solutions. It can be used on numerous materials such as ceramics, metal, and even rubber. Super glue changes to its final state quite quickly, hence, it is best suited for small repairs and works where time is important. Although there is a requirement for heavy structural support, super glue fails to meet the performance. Additionally, it does not work well on flexible or porous surfaces, which reduces its effectiveness.
Hot Glue: Hot glue sticks are powerful marketing tools for crafters and kids. It’s super convenient and helpful for arts and crafts. Hot glue cools quickly, providing support for temporary tasks or decorations. Other than that, it bonds nearly every crafting material, like ordinary plastic, wood, foam, and many more. While the final result is not as helpful or strong as other choices, it is still dependable for small and light crafting solutions.
Wood glue: This is intended for experienced carpenters. It is specifically designed for use on wooden surfaces. Aside from construction-grade wood glue, most of these adhesives are highly waterproof or at least considerably resistant to water, which increases their demand. With wood glue, one can be sure that the bond will last a lifetime. However, the curing process requires some level of clamping.
Knowing the different types of adhesives makes it easy to choose the right glue for your specific DIY project, ensuring functionality and longevity. Each type of glue has its distinct uses, as different materials, surroundings, and environments, as well as project objectives, need to be considered for an optimal solution.
Picking the most suitable construction adhesive
Picking a construction adhesive isn’t as simple as it sounds. A correct bond requires these considerations at a minimum to make it stable and enduring. First, ask yourself what pieces you plan on working with. Some commonly used ones include wood, metal, plastic, glass, ceramic, as well as concrete and drywall. Parts made from porous materials, like wood, have specifically tailored adhesives, while non-porous ones, such as glass and ceramic, also have separate options. If you are using multiple materials, then pick those labeled as multipurpose.
Next, consider the environment in which the adhesive will be placed. Adhesives used in moist, hot, or outdoor environments must be resistant to water, heat, and UV radiation. For extreme environments, solvent-based adhesives work best, although latex ones are better suited for indoor applications.
Another essential factor to consider is the bond strength required. Tasks such as fastening heavy structural parts together require high-strength, heavy-duty-rated adhesives. Lower-strength or fast-curing options work well for light materials that require precision. Fast-curing adhesives are best for quick fixes, while slow-curing adhesives offer repositioning during application. Both types allow for adjustment during use.
Lastly, pay attention to the application method. Some adhesives are dispensed in tubes, which can be applied directly using a caulking gun, while others come in spray or tape form. Prepare your project by selecting a format right for the scope and complexity of your project. The construction adhesive you choose ensures that your work will endure the test of time.
Analysis of superglue and epoxy
These days, superglue and epoxy are among the most popular adhesives. Each one has specific uses due to its differing properties and purposes. For example, because cyanoacrylate has quick setting capabilities, super glue is preferred for small and detailed tasks. It also works well with a variety of materials, including plastics, metals, ceramics, and wood. Proving a durable and rigid bond in a short amount of time. It does have some limitations, though. Placement of maximum load, high temperatures, moisture, and chemicals all tend to weaken its effectiveness.
Although less used, epoxy is still quite popular. Being a two-part adhesive made from resin and hardener, it requires stirring them together before application. There are benefits to using epoxy for heavy-duty undertakings, such as structural repairs or applications that require high levels of durability and stability. Becoming incredibly well resistant to moist environments, heat, and a broad range of damaging chemicals makes epoxy incredibly tough in demanding situations.
While superglue offers ease and convenience for small, everyday tasks, it would be outshone by the robust and long-lasting strength of epoxy for extreme industrial applications. Choosing between the two depends on the project’s scope and materials, as well as where and under what conditions it will be placed.
How does adhesion work in various materials?
Factors that impact Adhesive strength
Adhesion is determined by many components, including the type of adhesive and the materials being joined together. An important consideration is the substrate’s surface energy. Metals as a bonding material are generally surface-active, and plastic (i.e., low surface energy) materials are passive. Plastics, on the other hand, are not very surface active, so they do not bond well. Moreover, surface treatment also matters a great deal; a cleaning or roughening procedure, or priming with a material of lower surface energy, will significantly improve adhesion by providing sputter deposition anchor-capture sites.
No single type of adhesive is suitable for every application, but each has a well-suited option depending on mechanical, thermal, and environmental conditions. Metal bonds formed with epoxy adhesives are strong, while acrylic adhesives bond more weakly with plastic but do so more reliably. Of course, temperature, humidity, and chemical exposure over time will influence the strength and endurance of the bond. For example, adhesives exposed to extreme heat tend to have lower bonding strength because of thermal degradation. Being aware of these conditions helps tailor specific adhesion challenges and makes sure they are dealt with reliably and robustly.
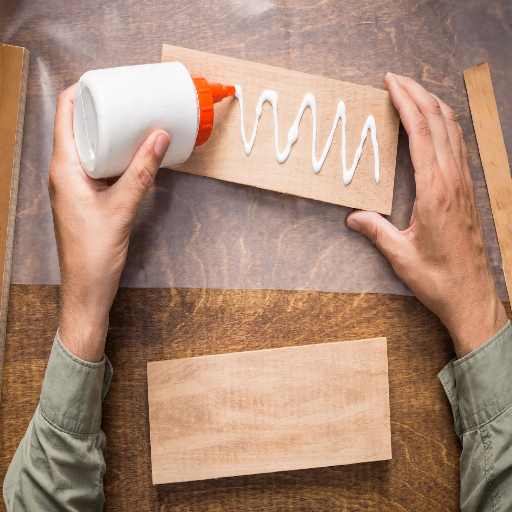
Best practices for achieving strong bonds with wood glue
To achieve reliable bonds with wood glue, following some tailored guidelines will guarantee optimal adhesion. First, the wooden surfaces need to be clean, dry, and free from dust, grease, or remnants of old glue. Contaminants hinder the glue’s bonding strength. Furthermore, adhesion can be improved through surface preparation, such as sanding with fine-grit sandpaper, which increases the surface area and provides a smooth, uniform texture for the glue to penetrate.
Secondly, selecting the right wood glue is also important. For general woodworking applications, PVA (polyvinyl acetate) glue is both economical and provides a strong, lasting bond to both hardwoods and softwoods. For other projects that may be exposed to moisture or temperature changes, use waterproof or water-resistant glues specifically marked for outdoor applications. Also, properly clamping the glued joint is critical to ensure that the correct amount of even pressure is applied to the bonding surface, preventing weak spots. For most projects, 30 to 60 minutes is usually enough for initial setting time. However, it’s best to allow 24 hours for a reliable total drying time.
The surroundings also contribute significantly to the efficacy of wood glue. Wood glue works optimally at moderate temperatures, generally ranging between 50°F and 80°F, and at a temperature-controlled relative humidity, to ensure the adhesive curing process is optimal. For maximum strength and durability, it is essential to follow the manufacturer’s application guidelines, paying attention to the recommended application instructions and drying times. Patience and precision, along with disciplined practices, help woodworkers create lasting bonds over time.
How varying surfaces influence the effectiveness of glue
For glue of any type, including wood glue, the kind of surface on which it is applied significantly determines its efficacy, and surface porosity is no exception. Untreated wood is a prime example of a porous material that enables adhesives to seep through and bond, thus increasing bond strength. Glues also tend to have more difficulty adhering to smooth or non-porous surfaces due to a lack of frictional texture. Additional sanding may be required for laminated or polished wood surfaces to allow for better adhesion.
Moreover, maintaining the surface’s cleanliness is vital, as dust, oils, or other residues may significantly compromise the bond strength. Each surface should be well prepared, clean, and uniform to allow for proper penetration and curing of the glue. For example, research indicates that sanding surfaces to between 120 and 180 grit levels enhances adhesion because the wood is not overly smooth, which would create bonding challenges. If one understands and applies the unique characteristics of the material used, these characteristics can significantly improve the adhesive’s performance and ensure the joints remain intact for a long time.
When should I use spray adhesive versus traditional glue?
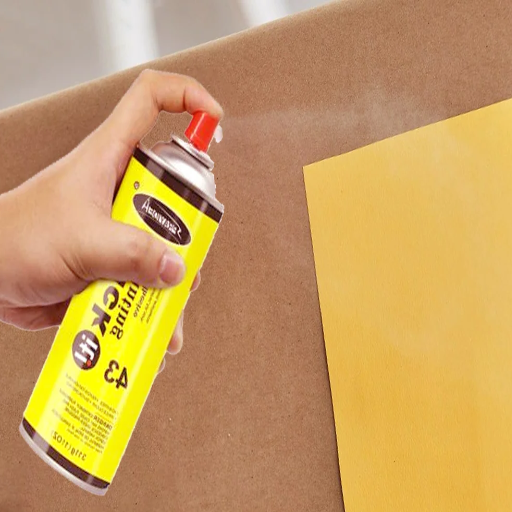
Utilizing spray adhesive presents several benefits
The advantages of spray adhesive include fastest application, precision targeting, and reliability, as it can outperform other adhesives that require brushes, rollers, or comb-like devices. There is no need for a glue application, and there won’t be any lumps because the versatile and all-encompassing adhesive will spray evenly. In heavily time-constrained industrial sites, workflow efficiency is paramount. As such, projects that require traditional glues are easily accessible with faster drying spray adhesive. Enhanced workflow efficiency, resulting from the improved advancement of productivity, becomes proficiently evident when time-sensitive projects are undertaken.
Spray adhesive comes with an unrivalled versatility advantage. They can be used to bond a range of materials, including metal, paper, cardboard, foam, and some plastics, making them highly beneficial for industries such as crafting, auto repairs, construction, and upholstery. Additionally, the spray comes with unique adjustable nozzles and features tailored spray patterns that can cover broad surfaces or target specific zones.
Over time and with innovations, technology has improved modern-day spray adhesives, ensuring that they provide a long-lasting bond even under harsh conditions. Higher-grade products guarantee flexibility, moisture resistance, and heat resistance, which increases their value and strengthens spray adhesives, allowing them to be used in both personal and professional projects.
Informal applications of a glue stick
A glue stick is one of the most user-friendly and easy-to-use adhesives. The best glue sticks are used in light-duty repairs, as well as in office tasks and other types of crafting. Their mess-free application, coupled with the moldable form of the adhesive, allows users to add more precision while working on detailed tasks like card making or school projects. Their effectiveness can also be seen when working with materials like fabrics, paper, and cardboard, as they produce a positive, tangible outcome.
Aside from individual crafting and other stationary uses, glue sticks find application in professional sectors like graphic design and packaging. Graphic designers often use glue sticks for mock-ups, prototypes, and visual presentations because the material can be re-adjusted before the glue sets. In addition, glue sticks are used in classroom activities by teachers and educators because they are non-toxic and child-friendly, unlike other adhesives. Their compact size and light weight make them ideal for the precision work that requires clean results without the use of complicated tools or long drying times.
Comparing Craft Glue And Contact Adhesive
When choosing the right adhesive for a specific project, craft glue and contact glue differ in function, meeting different requirements and working with various materials. Water-based craft glue is preferred for versatile, lightweight uses, such as attaching paper, fabric, and other small decorative pieces. Moreover, it provides a longer drying time frame, which allows for adjustments in application, making it more useful for intricate crafts and designs. Its inexpensive price, non-toxic nature, and suitability for children make craft glue popular among educators and hobbyists.
In contrast, contact adhesive is meant for more demanding tasks. It is commonly used for heavy-duty materials like wood, metal, plastic, and rubber because it forms a powerful bond. Moreover, unlike craft glue, contact adhesive must be spread evenly on both surfaces that need to be joined, allowed to dry slightly, and then attached. This process enables the adhesive to create a firm bond almost instantly, which is crucial in construction, furniture making, and industrial work. However, due to its potent strength and typically solvent-based composition, it needs to be worked with carefully, along with proper ventilation and protective measures.
Choosing between craft glue and contact adhesive depends on the size of the project, the materials used, and the level of detail required, showing how different types of adhesives serve specialized purposes effectively.
What is the best method to apply contact cement?

Steps for using contact adhesive effectively
Prepare the Surfaces: When using contact adhesive, the two surfaces to be bonded should be clean, dry, and free from dust, grease, or any other contaminants. A clean cloth soaked in acetone should suffice. A clean cloth free of residue is also a good alternative, as it helps maintain appropriate levels of adhesion.
Apply the Adhesive Evenly: Instead of a brush, it is easier to use a roller for contact adhesives. A uniform layer of the glue should be applied onto both surfaces. Care must also be taken not to overload the applicator, as this may lead to drips or uneven layers, which can weaken the attachment.
Allow the Adhesive to Cure: For the adhesive to dry to a tacky state, it is best to wait 10-20 minutes before applying. However, in the case of Depend, external factors like extreme humidity or temperature can severely impact adhesive bonds. Again, from the sample above, undersex therapy, always allow the manufacturer to set guidelines for waiting periods, as they are optimal in most cases.
Align the Surfaces Precisely: In the human case, once the adhesive dries to a tacky state, take care not to apply pressure immediately while aligning the surfaces to ensure proper positioning. This is because contact adhesive will instantly bond upon contact, offering minimal room for adjustments.
Apply Firm Pressure: Using a roller or similar tool, apply moderate pressure uniformly to the entire bonded section to ensure the adhesive is securely anchored and all air voids are removed. This step guarantees that the bond formed will be of maximum strength and increased durability.
Allow for Full Bonding Time: The adhesive may seem to hold immediately, but the actual curing process takes anywhere from 24 to 48 hours, depending on the product, when fully tested. Do not put excessive weight or stress on the materials that are bonded until the adhesive has set completely.
These instructions will help you achieve optimal performance from the adhesive while ensuring reliability and strength in the materials joined, provided that minimal mistakes are made. Always refer to the product’s specific instructions for optimal efficacy.
Tips for Using Contact Cement
When working with contact cement, several mistakes could affect adhesion and durability. One of them is not prepping the surfaces that are meant to be bonded together. The presence of dirt, dust, oil, or even water on the surfaces creates gaps that the adhesive cannot bond to. Ensure that both surfaces are free from moisture, dirt, and oil. Light sanding of non-porous surfaces also helps create a bondable surface, which enhances adhesion.
A layering error where not enough adhesive is applied is another frequent oversight. For a bond to be strong, both surfaces must have uniform contact cement applied to them. In an attempt to save time, some users do not use uniform contact cement or miss certain areas entirely. Furthermore, one must allow the adhesive to dry until it reaches a tacky stage before pressing the two surfaces together. This step, or skipping it, leads to a firm but incomplete bond, which is undesirable and weak.
Lastly, a common issue is improper alignment during the bonding step. Once contact cement is applied, no adjustments can be made because the bond is instantaneous. Misalignment can result in off-center or misaligned bonds that can become impossible to fix. To avoid this, carefully mark and measure the spots to help align the adhesive borders. Placing contact cement with caution allows for a clean initial surface, which provides a good cut joint. Steer clear of these misconceptions when using contact cement, and you are bound to obtain a strong, reliable, and unyielding bond.
How do I ensure a permanent bond with adhesives?
Ways to achieve maximum bond strength with epoxy
To guarantee a permanent bond using epoxy, I always make sure to prepare the surfaces I want to epoxy together first. Cleaning is a critical step because any form of dust, grease, or residue will significantly weaken the bond. For cleaning the surfaces, I use a suitable solvent, isopropyl alcohol, and lightly sand them to provide a rough surface texture that the epoxy can adhere to. The bond itself comes from a strong adhesive, which starts with a clean and well-prepared surface.
After that, I mix the epoxy resin and the hardener in the accurately specified ratio and order from the supplier. Going off from the instructions, either mixing order can mess things up, and making a mix that contains either too much or too little hardener can significantly damage the adhesion of the item. Mixing is a step that must be done carefully, as doing otherwise may cause air bubbles to form on the surface, which weakens the object. When applying epoxy, I make sure that it is applied uniformly throughout the entire surface to guarantee correct spacing and contact in all areas where the item is glued together.
Last but not least, I try to restrict my work within the open period of the epoxy, which is the time frame before the epoxy starts to harden. While the epoxy cures, I place the pieces in careful register and exert steady pressure to keep them fixed in position. Depending on the product, I may need to use straps or even weights to keep everything secure for the required curing time. Here, patience is the most critical aspect; rushing this step can result in a weaker bond. By following these procedures, I can consistently obtain a high-strength bond.
Comprehending the drying times of different glues
Comprehending drying times for different types of glue is crucial for achieving maximum efficiency in its application, as well as for its performance in a project. From my many experiences, different glue types have their own distinctive drying and curing periods, and individual drying times affect their performance qualities. For example, fast-drying glues, such as super glue, have a bond formation time that starts ‘setting’ in seconds. Its complete set phase is recorded to be in a range of minutes. This attribute tends to be helpful for quick alterations or short-term maintenance, but often lacks the flexibility or robustness needed for other detailed projects or heavy-duty undertakings. Wood glues, on the other hand, are usually characterized by several hours of drying, followed by a curing phase of about 24 hours. This characteristic prolonged bond period results in a much stronger, more durable bond, especially when clamping is applied during the curing phase.
Different types of epoxy have different curing times. Some epoxies begin to cure in as little as 5 to 10 minutes, while other formulations can stay liquid for about an hour. Regardless of the work phase, complete curing typically takes between 24 and 72 hours. In my experience, trusting and waiting through the various stages of glue curing and epoxy drying is the best way to assure longevity in the bond formed. If the glue is interfered with during the final curing phase, it often results in a subpar bond and an unfit final product.
It’s equally important to remember that temperature and humidity greatly affect curing speeds. Extremes on either end can be problematic, with cold indicated adhesive bonds forming at significantly lower rates, while hot and humid conditions can be useless altogether. Each project I take on comes with a set of instructions provided by the particular manufacturer and adjusted to these variables. With this practice, the expectations of high quality and reliable durability can always be met.
Picking an adhesive that goes well on porous and non-porous materials
One of the first things to do when trying to achieve strong and reliable mechanical bonds is choosing the correct adhesive for both porous and non-porous materials. For me, the first step is to categorize materials as porous and non-porous. Porous materials, in particular, include wood, cloth, and paper, which include lots of pores. Therefore, they are most readily soaked in adhesives such as PVA glue, wood glue, or even silicone-based adhesives—these types of adhesives bond well because they are viscous enough to penetrate the material’s stratum. For non-porous materials like metal, plastic, or glass, I use special adhesives such as cyanoacrylate (super glue), epoxy, or contact cement. These thin adhesives do best with smooth or non-absorbent surfaces.
I also think about the eco-friendliness and the final product’s use case. Specific materials, such as those that may come into contact with water and heat, require specialized adhesives that are either moisture-sealing or heat-resistant. In other instances where adhesion involves different materials, such as wood and metal, I prefer to use epoxy because it is multi-surface and bonds strongly. Doing thorough research helps me select the proper epoxy, which gives me confidence in the project’s durability, whether it’s a creative endeavor or a repair project.
As a strategy, I try to customize the adhesive according to the materials of the bond surfaces and the project’s requirements. Understanding permeable and non-permeable surfaces gives me an advantage regarding securing strong bonds that require very effective drying. Proper planning and researching the right adhesive beforehand means that I will achieve great results regardless of the project at hand.
-
Family Handyman: We Tested the Strongest Construction Adhesives – A detailed test of various construction adhesives, including their strength and performance.
-
Byrdie: The 5 Best Lash Glues of 2025, Tested and MUA-Approved – Reviews of top-rated lash adhesives, showcasing their ease of use and reliability.
-
Art to Art: 8 Different Types Of Craft Glue – A Guide – A guide to various types of craft glue and their applications.
-
Instructables: Choosing the Best Adhesive for the Job – Insights into selecting the right adhesive for different materials and tasks.
-
Dream a Little Bigger: Glue Guide – Use the Right Glue for the Job – A comprehensive guide to choosing the correct adhesive for specific DIY projects.
Frequently Asked Questions (FAQs)
Q: What are the top-rated adhesive glues for DIY tasks?
A: DIY adhesive glues ratings include Gorilla Glue, which can be used on many surfaces, as well as super glues, which are based on cyanoacrylate and dry quickly, making them strong. A specialized ledge glue for woodworking is designed to bind natural wood and plywood.
Q: Can I apply paint to adhesive glue?
A: Paint equipment, yes, many glues and adhesives are suitable and can be used with paint supplies. Look out for multi-purpose adhesives that are paintable and form bonds with drywall, ceramics, and polymer surfaces.
Q: Which adhesive is best for plastic surfaces?
A: For plastic surfaces, cyanoacrylate high-strength glue or solvent adhesive will be fine. These glues ensure strong bonds and are resistant to abrasion and wear on plastic materials.
Q: What is the best adhesive to use for laminate and cork flooring?
A: For cork and laminate floors, a low-odor, water-based flooring adhesive is best. These adhesives form strong bonds without dangerous fumes and ensure safe attachment to the floor.
Q: How do I use a glue gun for craft projects?
A: To use a glue gun for craft projects, you need to insert a glue stick into the applicator and plug it in. After allowing the glue gun to reach optimal temperature, you may proceed to attach the material that requires adhesive using the tip of the weapon. The appliqued glue, when applied carefully, will be great for bonding ceramics, fabric, and other craft materials.
Q: Is Gorilla Glue suitable for automotive repairs?
A: Absolutely, some Gorilla Glue can be applied when performing automotive repairs. It will provide a reasonable bond strength because it can withstand and adhere to a variety of surfaces, such as metals and plastics, which are likely to be present in any automotive project.
Q: Can resin be used as an adhesive for construction projects?
A: Yes, for construction projects, a resin-based adhesive is often used since these adhesives have an incredible ability to bind to materials and harden into solid, durable bonds. For heavy-duty tasks that involve bonding wood, ceramics, and even plastics like polyurethane, these adhesives are certainly a handful.
Q: What type of glue is recommended for woodworking and home projects?
A: Woodworking and even home projects will use a more specialized application of glue, called wood glue. Unlike other glues, it is specially designed to bond natural wood effortlessly. Moreover, it is a water-based, non-toxic wood glue, which is safe for use around the household and still provides strong, durable bonds.
Q: Are there any types of adhesives that are safe and non-toxic to use?
A: Non-toxic options do exist, including glues for crafting that are safe for children, as gentle as water, and do not have overpowering fumes. These non-toxic glues are also non-toxic and suitable for indoor use. This makes them perfect for family projects or other scenarios where clean air is essential.
Q: What steps can I take to get a strong bond across multiple surfaces?
A: For different materials, using a multi-purpose adhesive that works on all of the materials you need is highly recommended. For any non-specialized cleaner, make sure the item is clean and dry before applying any non-specific adhesives or intermolecular bonds. Follow all the manufacturer’s details and you will be guaranteed the best quality.


